
Before, you start to learn to deploy new WordPress on Google Cloud. Lets first know little about google cloud. It is a cloud hosting solution for website, app, Virtual machine, and many more such things that need hosting.
May I assume that you will know something about hosting, and if you are reading this post, then you must know it.
Things you need before deployment of WordPress on Google Cloud:
- Google account that has already a payment profile setup.
- Domain Name that needs to pointing your host
- And, Little patience to follow my tutorial.
Are you interested in hosting WordPress on Google Cloud?
In this tutorial, I’m going to tell you how to set up a WordPress website on Google cloud platform using it Google’s click to deploy WordPress.
I am thinking of teaching another tutorial where I show you how to deploy WordPress on Google cloud with using the bitaNami option, so in this tutorial, we will be using the click to deploy version.
How to setup and Install WordPress on Google cloud (Click-to-Deploy)
You need to follow 5 steps in this tutorial:
- Deployment of WordPress on Compute Engine
- Setup WordPress Configuration on Cloud Launcher
- Configure phpMyAdmin and MySQL root password
- Finally, Login to WordPress
- How to point your domain name to Google Cloud, vice-versa.
1- Deployment of WordPress on Compute Engine
 |
| console tab |
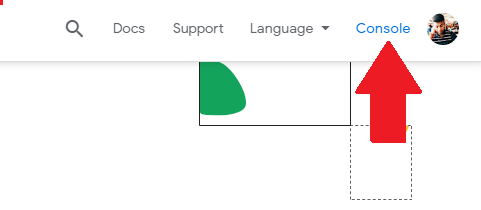
So the first step in this tutorial is to the right-hand corner of the screen and click the console tab.
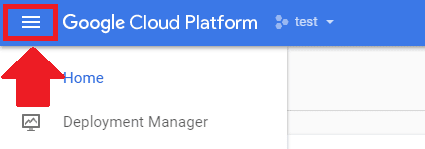
Next, we’re going to go to the upper left-hand corner of the Google Cloud Platform dashboard and click on the hamburger menu.

After that, click on the Market-place or tab in the left-hand menu of the screen.

Here you have to select the WordPress option Click-to-Deploy version.

Click on the “Launch on Compute Engine” link to launch WordPress deploy setting.
2- WordPress Configuration on Cloud Launcher
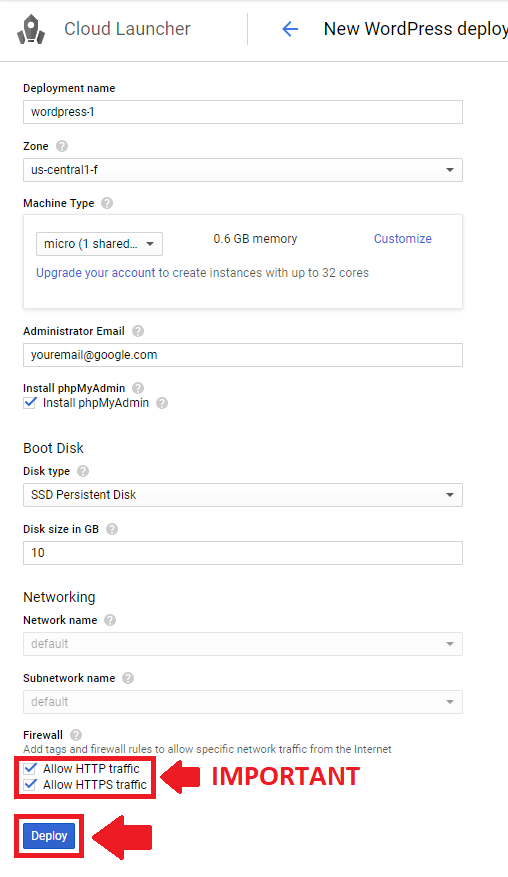
Fill up all fields according to your need as Deployment name. I’m just going to use the default, which is WordPress, for zone I’m going to use US central F, which is where my website hosted.
I’m going to use the micro shared CPU only because I’m going to be running a minimal website, and this is the cheapest option.
Type your administrator email here and check in the box where it says “install PHP, my admin.”
Check for a boot disk to use the SSD and for disc size 10 gigabytes, and for firewall, I’m going to leave both of these boxes checked to allow HTTP and HTTPS traffic.
3- Setup phpMyAdmin and MySQL root password
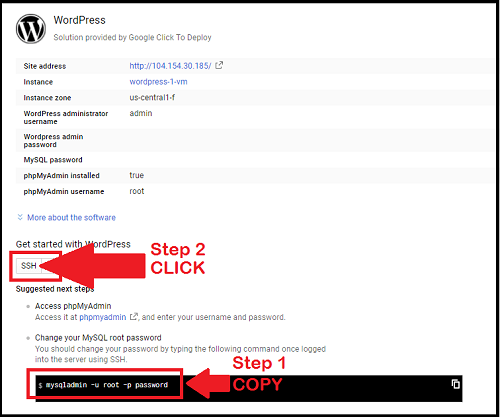
After your WordPress instance has been successfully deployed. We’re going to scroll down the page a little bit and copy command in the black box then click on the SSH button.
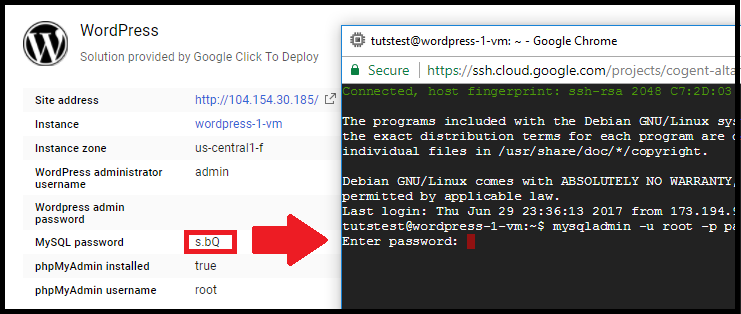
Paste that command in terminal and press enter key. Then follow on-screen instruction for password change.
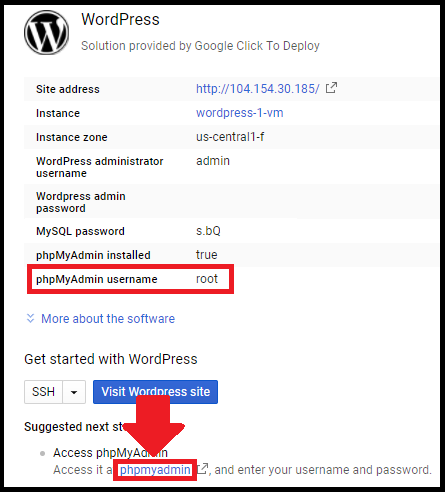
Don’t forget about to take note of your username and password detail. Click on the “phpMyAdmin” link to access the phpMyAdmin page. Use your saved credentials to further login.

4- Login to WordPress with the admin username and password

Now, Here is Suprise: Experience your new WordPress website by clicking on the “visit WordPress site” link.
To log in to WordPress, you need to add /wp-admin at the end of your website’s IP address in the address bar field.
DONE! Experience your new WordPress website hosted on Google Cloud
Are you really interested in the next step? Click Below
5- How to point your domain name to Google Cloud, vice-versa
If any type of doubt regarding this tutorial. Then or any questions about WordPress (Click-to-Deploy) on Google Cloud Platform. Just leave a post in the comment.