What did you need?
- Domain Name must be registered.
- Google Cloud Console account.
- I assume that you previously read this “how to set up and install WordPress on google cloud.“
To register a Domain Name:
How to Transfer Domain Names to Google Cloud Hosting?
There are 5 steps in this tutorial:
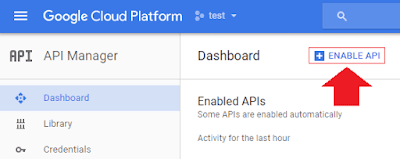
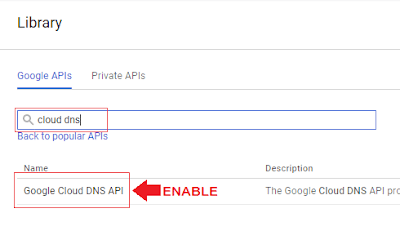
- Enable the Cloud DNS API in API Manager
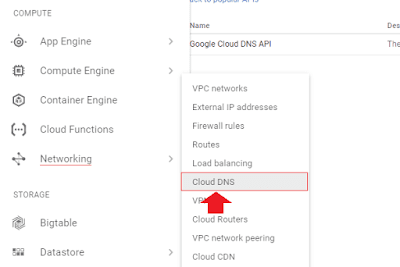
- Create a Cloud DNS Zone in Networking
- Add DNS Records in Zone Detail
- Configure NS Records on the domain name provider website
- Edit WordPress URL in wp.config and WP setting
So the first step in this tutorial is to go to the Google Cloud Platform. In the upper right-hand corner here – click the console tab
1- Enable the Cloud DNS API in API Manager
2- Create a Cloud DNS Zone in Networking
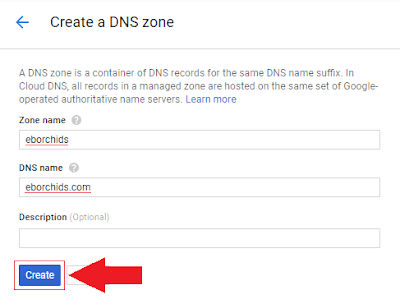
Now we’re going to create a new zone. In my case, the domain I am going to point to my Google Cloud Website is ‘freenaukrialert.in‘
Enter the name of your website in the ‘zone name field’ is going to be like FreeNaukriAlert. your “DNS name field” with website root DNS name like ‘freenaukrialert.in.’ Click on the ‘Create’ button.
3- Add DNS Records in Zone Detail
All right – so we’re going to add a new record set link appear in the next step.
we’re going to set an “Add DNS Records.” Select A in the ‘Resource Type Field.’ And we need the IPv4 address. Now the way to find IPv4, go through the next step or image.
Just open up another Google Cloud Platform tab to click on the hamburger menu above the left-side and navigate for Compute Engine > VM Instances. Here is our external IP Address, Copy this.
Add another record as a CNAME record. Enter ‘www’ in CName Field, Select CNAME in “Resource Record Type field” and finally your domain name in the “Canonical name field”.
4- Configure NS Records on the domain name provider site
Now our next step is to point domain from our Domain Name Provider to change our nameservers. I use GoDaddy, but you can use whomever you want, the procedure is similar.
Copy all 4 NS records that already generated automatically during the setup of “A” and “CNAME” records.
Now Go to your domain name provider site for login.
Search for manage option to click and open domain manger for DNS management.
So there you go – it’s all set!
Now, this change usually takes around 24 to 48 hours to change So be patient, and I hope this tutorial helped you.
5- Edit WordPress URL in wp.config and WP admin setting
If you have any questions, leave a comment in the box below or feel free to send me an email [email protected]


Love to read it,Waiting For More new Update and I Already Read your Recent Post its Great Thanks. free domain names
thanks hales… Your comment motivate me.